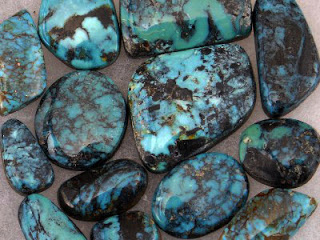
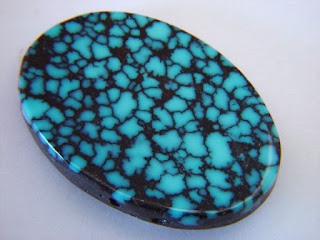
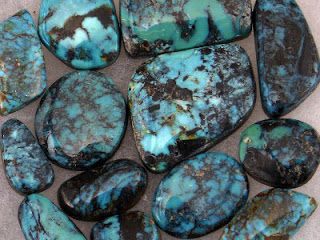
I have seen to date many tutorials showing how to make "realistic" faux turquoise.
Most of them involve breaking turquoise-colored clay in small pieces, then coating the pieces with various media in the black and gold colors, then pressing the pieces together to form a lump.
The resulting faux turquoise pieces look decent but still are not looking real enough. Mostly because:
1. the matrix in a turquoise is very very rarely black and
2. because very rarely actual gold coloring can be found in a turquoise - the stone takes its color from copper, and where there was too much copper it will have agglomerations of reddish, not gold-tinted mineral. The very very rare stones with real gold coloring are usually from deposits neighboring gold mines and the turquoise is tinted green not blue exactly because of the gold. So there is no real authentic blue turquoise with gold inclusions.
3. the black acrylic paint is too thin, the resulting pieces usually look like dyed howlite. So you'll imitate a faux turquoise. Making a faux faux turquoise. Heh. Seriously, the way you distinguish a howlite from a real turquoise: even color and even thickness lines. If you got both, it's howlite. If you have just one of the two, it's turquoise.
4. Buffing/varnishing too much. Turquoise is a soft stone. Normally, unless it's stabilized, it will not buff to a high shine. Very few turquoises are high grade enough to give a high shine. Also, varnishing the indented matrix. Huh?
When attempting to make a faux turquoise,there are a few things one has to take into consideration. The main one being: what type of turquoise are you attempting to replicate?
Here are a few tips.
1. Choose your main color of clay.
Fortunately there are shades of turquoise in all the polymer clay brands out there. When choosing the color, keep in mind that, except for very few mines, like the Sunnyside mine in northern Nevada, in all the other mines the extracted turquoise is a specific shade of color when it comes to turquoise blue. The green stones may have different shades, also because turquoise degrades easily, that is why most of the stones that are polished and set in jewelry are treated so they wouldn't degrade and change color. There are different hues of the same shade (not sure if I explain it right), but that is always in a type of gradient, you don't have usually one little nugget of one distinct hue next to another nugget of a completely different hue separated by a matrix line. There is some kind of transition and sometimes there are hues within hues. Thus you can't put a Fimo peppermint piece next to a Souffle robin's egg piece and expect for your stone to look realistic to someone who has seen a single turquoise in their life. The same, there are very few real turquoises that will have the same exact shade and hue all through the stone, without a single speck of difference. When they do, that's a dyed howlite.
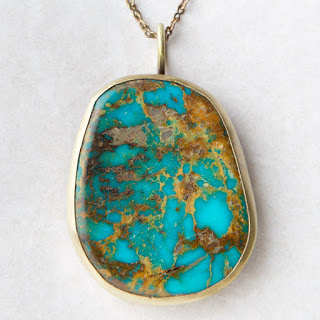
the most known is the Royston turquoise, with a heavy matrix of various shades of ochre, brown, red and even grey.
The Blue Diamond mine gives turquoises with a very heavy dark grey and sometimes even black (one of the few I was talking about) matrix. Also can have a lot of "dirty turquoise" stones.
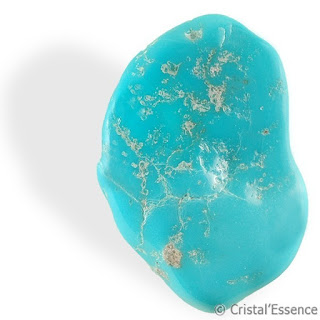
The Sleeping Beauty mine has given some of the most prized turquoises. Some almost pure, with barely or no matrix, and also the rarest of all, the white matrix.
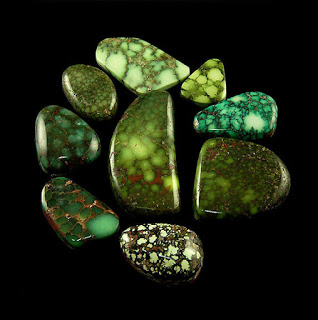
A few stones from the Damele mine, with perfect examples of not only green turquoise, but also of gold matrix in green turquoise, cloudy matrix and spiderweb matrix
When several shades of blue or green distinctively separated can be noticed in the mineral, usually that is not pure turquoise, but a combination (chrysocolla) of turquoise with azurite and malachite, and sometimes even other minerals.
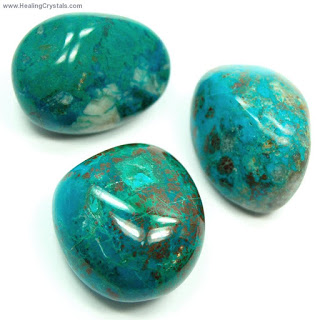
Gorgeous, isn't it? This is chrysocolla. It has azurite mixed in with the turquoise. When there is malachite too it's easier to identify because of the banding specific to malachite, but when it's azurite that is usually the only thing that will give it away, the different shades of blue in the same gem. That, and a weaker matrix.
You can also make turquoise green, as stones from several mines are actually green not blue, like the ones found in Nevada - reason why they are called "Nevada Green Turquoise". Among the most famous mines for green turquoises are Blue Gem, Carico Lake, Battle Mountain and the Fox mine.
Carico Lake turquoise is famous for a special type of green turquoise that takes the color from a high zinc content, and they are described as "spring green" or "Irish green".
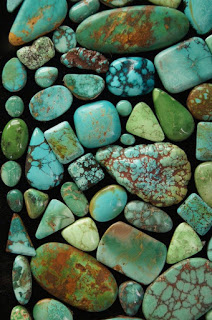
Carico Lake turquoise. Many shades can be found here and one of the few where you can see more than one shade of blue in a real turquoise. Beware of another trap though: do not confuse faustite with green turquoise!!!
There is also fabulous caramel brown, red or yellow turquoise, like the one found in the Tortoise
mine in Nevada (where gorgeous variscite can be found too).

Various colors of turquoise from Tortoise mine. Also with the rarest of matrix webbing, the "water web"
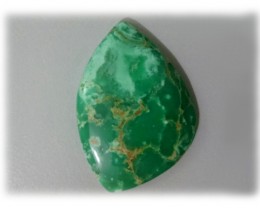
And... another trap. Enter the Variscite. Actually most of the stones pretended to be real white turquoises, if they're not dyed howlite, they're variscite. Variscite is very beautiful by itself though, do not think that it's not. But it would be easy to think you made a faux turquoise and... it looks like variscite but you don't know that.
2. Decide on the matrix type.
Some matrices may show as very fine lines (light matrix), but some have a more cloudy effect, like the Sleeping Beauty turquoises or can even have a very heavy matrix where the turquoise stone itself shows very little. Keep in mind that in the world of real gemstones, the less matrix on a turquoise (the cleaner the turquoise) the more precious it is - except for several varieties that are actually prized for the beauty of the matrix itself, like the turquoises found in the Morenci copper mine in SE Arizona, that have a highly prized brown matrix called "Morenci red matrix". There are two things to take into consideration when choosing the matrix type:
- - the clarity and definition of the lines (some matrices are "smoky" or "cloudy" while others form more defined lines) and the amount of matrix shown.
perfect example of "smoky" (cloudy) matrix. See how the lines between the matrix and the gem are blurred?

Compare it with this one. See how well defined are the separation lines between the matrix and the gem? Still no straight lines though, and the thickness of the matrix line is randomly changing
The matrix in a turquoise can be spiderweb - running throughout all the stone, dividing it into smaller turquoise pieces; or "heavy", non-webbed, with large areas of matrix with interspersed actual turquoise pieces.
A few examples
spiderweb matrix (high grade)
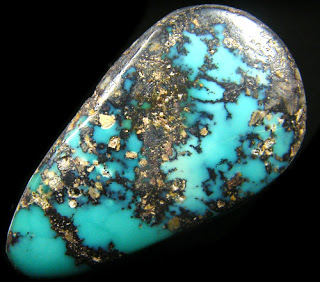
Compare it to this "boulder". Also, notice the flecks of copper. Copper, not gold
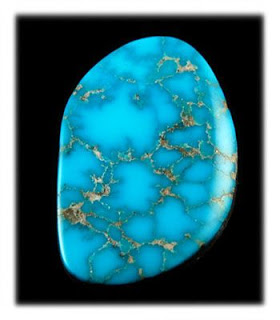
The famous Morenci matrix. Note the very light matrix (usually pyrite that can give it even a silver color). The interesting part about the Morenci stones is that they have a little transparency and also even if at first look the matrix line look well defined there is "smokiness" in the turquoise nugget. This one also has a "waterweb", notice the gradient at the edge of the blue areas.
3. Decide on the transparency of the stone.
About half of the turquoise gems have some degree of transparency, and some of these are highly prized. The Candelaria turquoise for example, that used to be mined in the Candelaria Hills in Nevada. The Candelaria turquoise is one of the most highly prized turquoises due to its hardness, the translucent dark blue hue and the reddish brown spiderweb matrix.
Same goes for the Dry Creek or White Stallion turquoise, a variety that is almost white - actual turquoise not howlite, magnesite or calcite. Real white turquoise is extremely rare - like the one in White Owl mine. It's turquoise without copper in it.
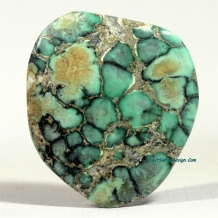
Candelaria turquoise

Dry Creek turquoise - notice what a light blue color

White Stallion turquoise - almost white
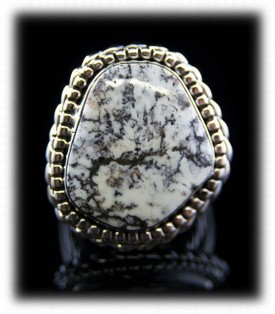
White Buffalo turquoise. Most true white turquoises are very soft, some of the ones mined at the White Buffalo mine are though hard enough to polish and set.
4. Choose the matrix color.
As I said, gold is never found in natural turquoise. The closest metallic hue is a very light bronze. Most of the metallic inclusion areas will be of a reddish brown or golden brown. As color, matrices can be very varied: "black" - which is in fact various shades of grey. This type of matrix forms from iron sulfide/pyrite inclusions. what you see as really black matrices are in fact white matrices that have been dyed black. "Yellow" - which are in fact various shades of ochre. They are in fact rhyolite, a volcanic rock; turquoise usually forms in rock with a volcanic origin. And "brown" which is one of the around sixteen types of iron oxide known to form matrices in turquoise.
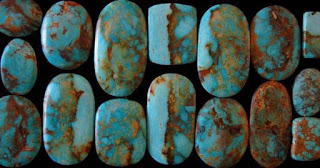
Kingman turquoise with ochre matrix

Green Manassa turquoises with gold matrix

Chinese turquoise with brown matrix
Again the Blue Diamond turquoises as an example of natural "black" matrix

The black matrix in this turquoise is black because the stone has been "stabilized", treated so it wouldn't degrade and change color, and so it would become harder (turquoise can be very soft sometimes). Also notice how the lines change thickness, which is the sign it's not howlite
So I thought of making this blog entry in preparation for a tutorial I'm planning. Don't get me wrong, I am not trying to bash other artists or put them down, on the contrary, I think that some of them have achieve gorgeous results.
In fact, here are some tutorials that can be found on Youtube - and you'd better watch their other videos, as they have a plethora of useful information if you want to get into polymer clay sculpting.
1. Exceptional tutorial when it comes to the result. It even went for the brown and not so much black-looking matrix. The result does show realistic matrix that even has cloudiness. The only faults I would find to it is that considering the type of matrix that results from this technique it should have more faux rhyolite showing and also that she could have chosen a more "turquoise"-ish color.
Faux Turquoise with Polymer Clay Tutorial Super Simple
2. Ludmila Bakulina's tutorial. Ludmila is very good technicia and her tutorials aren't bad - even if a tad long for my own personal taste. In this tutorial she actually uses more than one technique (including Tory Huges' technique), which is very important for learning the "what" and "what not"s.
Watch carefully in the beginning when she shows the resulting faux turquoise pieces from the different brands of polymer clay.
The ones she made out of the big package of Fimo professional are close to perfection, but... she used gold. If she would have used a bronze or a mix of bronze and copper, and a brown instead of the black (and that can even pass as there are some stones that do have a black matrix), these stones would have been very hard to distinguish from a real turquoise by sight only even for the connoisseur. Even using a single shade of clay, again, there are some stones that will not have variations
The Cernit ones on the other hand are the perfect example of how NOT to.
Very good lesson here: be very aware that different brands of clay will react differently with the media you're using for the matrix; they will also agglomerate and clump differently.
Look at the photo that is used for the video thumbnail. She amazingly even manages to get a faint "waterweb" effect that is specific to Kingman mine turquoise, and the darker blue used in this stone is specific to Kingman mine stones. But... the gold flecks.
If you use this technique and actually make a gradient blend to show a little variance, and use other flakes and not gold, your stones would be hard to distinguish from a real spiderweb nugget.
DIY How to make Realistic Natural Turquoise Stone. Stone imitation technique. VIDEO Tutorial!
3. This one has good things and bad things.
Good things: uses brown also instead of black.
Bad things: uses mica-powder clay (pearl white) and glitter in the blue. Turquoise has no sparklies.
Warning: Using acrylic paint by itself will result in straight-line fine matrix, which is a no-no, as it doesn't really exist in natural turquoise. Even mixing the acrylic paint with liquid clay has to be done very carefully, and with "thickened out" liquid clay - or "thinned out" regular clay, however you want to call it, it's actually the consistency of thick mud that you get if you smush some clay and liquid clay together in equal parts - it's a messy, stinky result but it works. Use very little acrylic paint, just enough to give it color.
Faux Turquoise polymer clay tutorial - Part 1
Polymer clay tutorial Faux Turquoise Part 2
4. This following one has chosen a perfect color for the matrix, very similar to the natural one, but again the mixing with paint strikes again.
For this amount of matrix shown, the matrix should be cloudy, not so precise, and a mix of big chunks and much smaller chunks would be expected. Look at the photos of real turquoises above.
Great choice of clay color as well. She actually uses one of the techniques Ludmila Bakulina has shown but with her own choice of matrix color paints.
Also, another problem - and that is valid for other tutorials, too - the pieces must not be with straight edges. Turquoise comes in "nuggets", that is, rounded (to a point - sorry no pun intended) so you must make sure that your pieces do not have straight angle corners and straight line defined edges. At least not for the nugget-type ones. The "boulder" might get that, but then the matrix in a boulder turquoise is very different, and the turquoise part too.
FAUX TURQUOISE from Polymer Clay
5. Now a tutorial that I am afraid is a complete fail. Can you see why?
How to Make Faux Turquoise with Polymer Clay
6. This following tutorial is very interesting and shows that one shouldn't throw out the baby with the water.
The acrylic paint CAN work, but not with the "clump your pieces together, shape them and bake" technique.
This lady actually makes a veneer out of the unbaked clay, that looks absolutely great!
If she would have used brown instead of black, especially for that color of clay, her result would have been close to perfect.
I also like how she got on some pieces the "dirty turquoise" look where fine microscopic grains of turquoise are mixed in the matrix giving the "dirty blue" color.
To note that, with this one, considering that she used a green turquoise color, the gold part is fine. But don't ever EVER use nail polish on polymer clay. There are some UV nail gels that work, but if you don't know if they do, don't risk it. Anyway. This looks almost like Nevada green turquoises or some of the pieces from Mexico.
Spellbinders Media Mixage - Making Faux Turquoise with Polymer Clay
I will stop here with the examples. Hopefully soon I'll be able to make the tutorial and show most of the types of turquoises.
P.S. To answer some of your private questions: Even if I'm not an expert in gemology and I don't have an academic degree on it, I know quite a bit about gems. I've spent over 3 decades buying and selling them, and especially when it comes to turquoises, I was fortunate enough to learn a lot from several Native American silversmiths. Native American silver jewelry has a special place in my heart. Maybe one day I'll make a tutorial on how to make Native-American inspired faux silver/turquoise jewelry. Slapping together silver polymer clay and a faux turqoise, even with pretty textures and nice shape is not all that is to it. You must know and understand the spiritual part of it, what each decorative element means and what is the spiritual intent behind each piece.
I put this together with the sole intent to make you understand what are the differences in various types of turquoises, so you will be able to achieve good results when you try to imitate a turquoise.
